
Handbrake is not strange to almost all people. It is a good helper to convert videos for free on multi-platform. Thanks to its open source and cross-platform compatibility, more and more people love to use it to complete their converting task. Though as popular as it being, still many people get confused about the right workflow of Handbrake, and today I'll focus on ripping a DVD with Handbrake in a smooth and easy manner.
Part One: Steps of ripping DVD via Handbrake
Step 1: Install This Free DVD Ripper
Only if you make Handbrake download on your platform can you rip a DVD with this free DVD ripper software. Generally, Handbrake is compatible with both Windows and Mac. So make sure the Handbrake version to be downloaded is made for your operating system.
Tips: If you've updated your Mac to the latest OS X 10.11 El Capitan, for smooth DVD ripping, please turn to a Handbrake for Mac alternative, like Brorsoft DVD Ripper for Mac, for your Mac DVD ripping needs.
Step 2: Select a Source DVD You Want to Rip
After you launch Handbrake, you will be asked to locate a source. Specifically, there are three options listed including Video File, Folder and DVD Drive Option. In order to employ Handbrake to rip a DVD on Mac, you can insert the DVD into your Mac’s DVD drive and simply choose the DVD you wish to rip from the drop down menu.
Warning: Handbrake only works with the DVDs that DO NOT contain any form of copy protection. If you run into a DVD with 99 titles of almost the same length, you are probably thwarted by a copy-protection scheme. To solve the problem, you can turn to VLC. If all else fails, you are advised to find a DVD ripper for Mac with DVD decryption ability for better results.
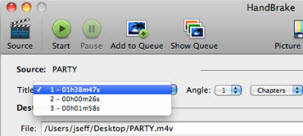
Step 3: Choose a Title and Chapters
Once the source data has been loaded by Handbrake, you will see the Title drop-down menu at the upper left-hand corner. For non-commercial DVDs, Handbrake will select the main title for your source by default. Personally, if you want to rip the entire movie, the track with the longest duration is usually the one you shall choose.
Tips: And the same goes for TV episodes. But unless you wish to encode a specific range of chapters, you are suggested to leave the chapter drop-down menus at their default values.
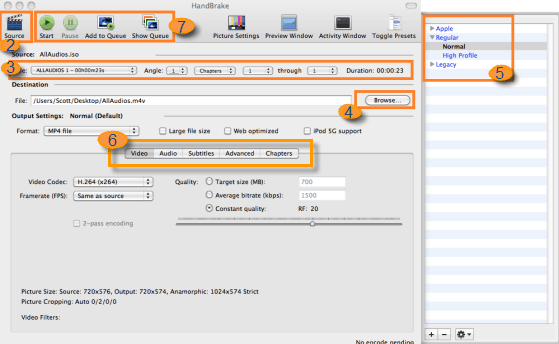
Step 4: Select the Destination Folder.
Click the "Browse" button to choose the path where you want to save the output file in. Then Click "Save".
Tips: You can enable/disable and configure automatic file naming in the program options.
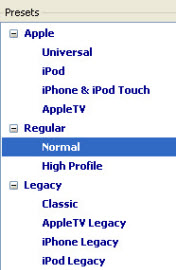
Step 5: Choose Preset for Your Device or Output Format
To be frank, Handbrake provides handy presets for iPhone, iPad, iPod, Apple TV, etc, making it pretty easier. In case the Presets Drawer fails to open, simple hit the “Toggle Presets” button at the top, then presets for Apple, Regular and Legacy will appear. Choose the one you prefer. For example, if you’d like to play DVD on iPod, simply move the mouse to iPod and hit it, then you are allowed to rip DVD to iPod on Mac with Handbrake. The same goes on other devices. Meanwhile, "Universal" is better for outputting videos for enjoying on mobile devices while "Normal" and "High Profile" are especially provided for watching on computer or TV.
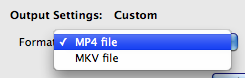
Besides, Handbrake gives you a hand to rip DVD to MP4 and MKV for free. You can set your encoding settings manually based on the device on which you plan to view the content.
Step 6: Tweak Your Settings
This can be a nuisance for new beginners, but for advancers it is really a boon. You can adjust the output parameters of picture, video filters, video, audio, subtitles, chapters, etc. to make the output videos more personalized and suitable. In this Handbrake user guide, Handbrake video settings, audio settings and picture settings will be specified here to best suit your demand.
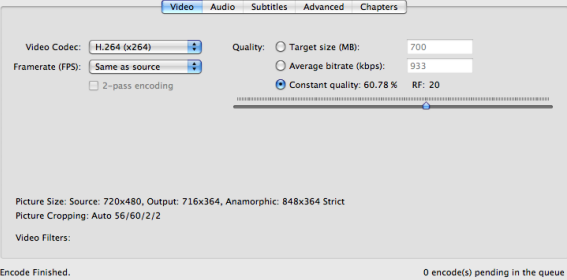
1). Handbrake Video Settings
This section allows you to adjust Framerate and Video Codec you prefer. when using Handbrake to rip DVD, keep in mind that the output quality lies on the size you specify. You can also alter the bitrate of your choice. Remember: the higher bitrate you choose, the better quality you will get but the bigger size the output file will be, hence more time it will take to rip DVD with Handbrake.
2). Handbrake Audio settings
This section is where you can adjust audio tracks and movie subtitle of your ripped content, as shown in the above figure. Generally speaking, you can leave this alone. But if you do want to change it, note that the audio bit rate shall be below 160kbps if you are ripping a DVD for your iDevices.
3). Picture Settings
It’s often the case you find horizontal lines in many TV shows of DVD forms. Technically, these DVDs are interlaced, making them fuzzy to watch. The “Picture Settings” button on the top of Handbrake interface is especially designed to get rid of interlacing and makes DVD ripping smooth. What’s more, this section also lets you set video resolution and crop video. For example, as 640*480 resolution is the optimized one for iPod Touch, so you can either set up to the same resolution as the original for the lower resolution of the original or set up to 640*480 resolution for the output for the higher resolution of the original. As far as I’m concerned, the crop function of handbrake for Mac is not so practical. Instead, it’s just a kind of ornament here.
Step 7: Commence DVD ripping with Mac Handbrake
Once you finish all the settings, you can go ahead to rip DVD on your Mac computer by simply pressing the "Start" button on the left top of Handbrake for Mac version. Alternatively, if you have a source with multiple titles, you can queue these up using "Add to Queue" button. Once your queue is accomplished, click the "Start" button to begin batch DVD ripping process on Mac with Handbrake.
Tips: As is mentioned above, Handbrake has no supported for ripping protected DVD discs, not to mention its limited output formats, say MP4 and MKV. And according to multiple tests, it also doesn't work well with the latest Mac or Windows version - El Capitan and Windows 10. So if you intend to copy commercial protected DVDs and convert them into more other video formats like WMV, MOV, AVI, FLV, etc specially for other decent devices like Windows Movie Player, Quicktime, Kindle Fire HD, Galaxy S3, HTC One X, etc, you'll need to turn to a professional Handbrake alternative - Brorsoft DVD Ripper for Mac, which can not only bypass all kinds of DVD copy protections but also easily copy and rip DVD to WMV, MKV, FLV, MP4, MOV, etc optimized for iPhone, iPad, Android phones and tablets like Nexus 7, Galaxy Note 4, etc with best video quality.

More Tutorials:
Digitize your DVD Collection on Mac(El Capitan Included)
Rip and copy DVD to Chromebook 2 for easy playback
How to Rip and Copy Netflix DVDs on Mac
This is an instructional tutorial on how to rip and convert DVD to MKV videos on Mac, so that you can easily and freely watch and backup your DVD movies.
ReplyDeletehttp://juliet-tech-rip-blurays-dvdss.hatenablog.com/entry/2016/05/10/101540
Best Handbrake alternative to rip Blu-ray/DVD or convert video at will - Leawo Prof. Media
ReplyDelete