Pages

Sunday, November 29, 2015

Converting DVD ISO image to MKV videos losslessly

Summary: Wanna a quick and easy way to convert your DVD ISO to MKV videos? Here I will provide the way to encode DVD ISO to MKV with the best quality.

Chances are you have a bunch of ISO image files ripped from your DVD discs or downloaded from the Internet, ever thought of enjoying them on HD TV or watching them on the go? But the problem we must face is DVD ISO file can only be played with virtual driver software or the similar tools, and you can't play ISO on most popular media devices or share on website directly. Then you’re probably eager to change the ISO format to MKV or some other format, so that so that you can easily share the movies or play the movies on some media players. In this article, I will outline a way to encode DVD ISO files to MKV video keeping original quality.

Here some people may have doubts: Why we need to convert Blu-ray ISO to MKV rather that ISO to AVI or ISO to MP4. In fact, MKV is widely supported by many HD media players: Western Digtial TV Live, Seagate Theatre Plus, Popcorn Hour C-200, etc. On computer you can either use free VLC media player and Mplayer for MKV playback, or enable Windows Media Player and QuickTime to play MKV by installing free codec packs. Back to the point, how can we convert DVD ISO image file to MKV sucessfully? In that case, a decent DVD ripper plays a big role. Here Brorsoft DVD Ripper is highly recommended to you to rip your favorite DVD ISO movies to MKV with fast ripping speed and lossless video quality.

Apart from MKV, it can also convert ISO/DVD/IFO to almost all regular video formats, including MP4, AVI, ASF, MOV, M4V, MKV, WMV, DV, VOB, MPG, TS, TRP, DPG, 3GP, 3G2, FLV, F4V, SWF, etc. If you are a Mac user, please turn to Mac DVD ripper, which has the same functions as the Windows (Windows 10 compatible) version. Now don't hesitate to try the program and check out the guide below on how to convert ISO image files to MKV videos step by step.

Easy Solution to Rip DVD ISO to MKV with the best quality

Step 1. Run the program and click DVD disc button to add the ISO files. As you can see, you can also load DVD Folders and IFO files to rip. All added files can be previewed on the right viewing window and you are free to adjust the video volume and take snapshots of your favorite movie scenes.


Step 2. Choose "MKV" as the output format from "Format" > "Common Video". If you'd like to generate HD MKV videos, you can select "HD Video" > "HD MKV". Then you can click "Settings…" to tweak the detailed video and audio encoding settings.


Tip: Click the "Settings" icon, and you can adjust codec, bit rate, frame rate, sample rate and audio channel in the interface according to your needs and optimize the output file quality.

Step 3. Finally, tap the "Convert" button to begin converting DVD ISO files to MKV videos. After a while, you will get the MKV video files for widely use.

Thursday, November 26, 2015

Guide on Converting and Importing DVD ISO movies to Android tablet/phone

Summary: The guides shows you how to convert ISO files to Android phone or tablet compatible videos so that you can play ISO files on Android with no hassle.


Android is more and more popular all around the world. No matter the Android phones or Android tablets, such as Samsung Galaxy Tab, Kindle Fire HD, Nexus 4, Galaxy S IV, etc. are all the market hot spots. Most of the Android gadgest are great for watching movies. Chances are you have some ISO files ripped from a DVD or downloaded from the Internet, ever thought of playing them on your Android portable devices? The following guide aimed to show you how to put ISO videos onto your Android tablet/phone to have more fun.

As all we know, ISO image is easily burnt to DVD disc and transported through internet. But it’s pity that so far no portable device supports this file, making ISO image poor

for portability. Thus, in order to watch DVD ISO movies on Android, you need to convert DVD ISO to Android supported video formats (e.g. MP4) first. It can be done effortlessly along with some help from a professional DVD ISO to Android Conversion tool.To get the work done, Brorsoft DVD Ripper is the one of the best choices for you. 

With it, you can fast convert DVD ISO movies to Android tablet/phone compatible video formats with excellent audio & video quality. Plus, lots of video presets are provided for kinds of Android devices like HTC phones, Samsung Galaxy S4, Motorola Xoom, Galaxy Tab 2, Glaxy Note II, Kindle Fire HD, Google Nexus 7/10, Nook HD, etc. with the best settings for playback on a certain Android device.
What's more, some video editing features like trimming, cropping, adjusting video effects, etc. are provided to customize your videos. If you are using a Mac and want to copy DVD ISO movies to Android from Mac, please turn to the equivalent Mac version called Brorsoft DVD Ripper for Mac. Just get the DVD ISO Converter now and freely enjoy your funny DVD ISO movies on your Android phones and tablets.

How to convert ISO to Android friendly formats
Step 1. Import ISO image files

Launch the ISO to Android tablet/phone Converter and click "Add File" button to locate the ISO file(s) you want to add. Check the "Merge into one file" box, you can join several .iso clips together if necessary.


Step 2. Choose output format

Select an Android friendly format, e.g. H.264 .mp4 for conversion. Basically the "Common Video -> H.264 Video (*.mp4)" is a universal format for Android tablets and smartphones.

Besides, there are optimized formats for Samsung, Motorola, Acer, Asus, Sony, Toshiba, HTC, etc branded Android devices; choose a proper one as you need. Or depends on your device, you can choose a suitable video format from "Android" catalogue.


Tip: If you think the video size this not suitable for your Android Tablet or Phone, you can first choose any one of the provided type, then change the settings. Please remember the file size is based more on bitrate than resolution which means bitrate higher results in bigger file size, and lower visible quality loss. See the following

picture:


Step 3. Start to Convert DVD ISO for Android

When all the settings are OK, click "Convert" button to start converting DVD ISO movies to MP4 video for playback on Android tablet/phone at ease.

When the conversion is over, click "open" to locate the ripped video files. After that, you can connect your Android phone or tablet to computer via a USB device and transfer the videos to your device for enjoyment on the go.

Tuesday, November 24, 2015

Convert and Import DVD movies to Nexus 7/10 for easy Playback

Summary: This guide aims to teach you how to rip and convert DVD movies to Nexus 7/10 for more convenient playback.

Google Nexus 7 is powered by android 4.1 jellybean operating system with 32GB of storage and the option to add mobile data. And Nexus 10 features an impressive 2650*1600 pixels resolution, HD display, 9000 mAh battery, etc. In a word, both of them are great tool for watching HD movies.

Chances are you have a bunch of DVD collections at hand, ever thought of viewing your funny DVD movies on the go with better visual experience? While, just like other Android tablets, the Nexus 10/Nexus 7 still come with no BD drive or DVD drive. So if you have some DVD movie collections, you’ll need to convert DVD to Nexus 10/Nexus 7 supported video formats first and then transfer the converted videos to your Google Tablet for watching.

In order to rip and convert DVD movies to Google Nexus 10/Nexus 7, here Brorsoft DVD Ripper is highly recommended. It's an intuitive DVD converter that allows you to easily convert DVD to Nexus 10/7 MP4 so that you can enjoy any DVD movies on your Nexus 10/7 on the go. With a few clicks, you can copy your favorite DVD movies to Nexus 10/7 for enjoyment anywhere anytime. You can also use it to convert DVD to play on iPhone, iPad, iPod and more. Up to 250+ output format supported. Now download it and follow the tips below to finish your task. If you are a Mac user, you can turn to Mac version for help. Now just get the DVD to Nexus video converter now and freely enjoy your DVD video on your Nexus 7/10.

How to convert DVD movies to Nexus 10/Nexus 7 in clicks

Step 1. Add DVD videos

Open the DVD Ripper and click on the upper "Load DVD" button to load the DVD movies you want to play on your Nexus tablet. All added files will be listed on the left source area. You can preview the DVD videos on the right viewing window and take snapshots of your favorite movie scenes.


Step 2. Select Nexus 7 or Nexus 10 output format

Select MP4 as the output format. Click "Format" bar, follow Android > Google Nexus 7 H.264 MP4 Video (*.mp4), which is the proper choice for 10-inch tablet.


Options: You can click "Settings" to manually change the video encoder, resolution, frame rate, etc. as you wish. For DVD movie source, setting the video size as 720*480 is enough and setting the video bitrate as 1000kps ~ 2000kps is proper. If you stick to the 1080p quality, you can set the video size as 1920*1080 and video Bitrate (kbps) as 2000, but you will get a larger file size.

Step 3. Start converting your DVD movies

After all necessary settings, simply click the big Convert button to start converting the added DVD files to Nexus 7 or Nexus 10 compatible videos. Wait for the conversion to complete and click Open Folder to get the converted videos instantly. After that, transfer them to your Nexus 7/Nexus 10 tablet and watch them anywhere you go. Just enjoy your movies!

Sunday, November 22, 2015

Top 5 Free DVD Ripper for Mac (E1 Capiatn Included)

Summary: Are you looking for a free yet powerful Mac DVD Ripping software to rip and convert DVD to other popular video formats for watching, editing, storing or other demands, here we will show you top 5 DVD Ripper reviews. You can according to the reviews to choose the best DVD Ripper software by yourself.

Perhaps you have collected a bunch of DVD discs in your home. In general, we play the DVD movies on smart TV via a professional DVD player, it's pretty good to enjoy DVD medias with bigger screen. Then ever thought of importing DVD movies into your tablets or smartphones for enjoyment on the go, or want to edit DVD videos via our editing softwares? For this case, a professional DVD Ripper tool is required.

In view of there are so many relevant DVD Ripper programs under the current market that make it a hard-scratching issue to choose a best and reliable DVD Ripper application. Therefore, today, this article will introduce top 5 free Mac DVD Ripper Program for you on Market which will have the stronger functions that are enough to help your ripping requirements. Just hold on reading.

1. HandBrake

HandBrake is an open-source DVD ripper especially designed for users to convert DVDs to iPad, iPhone, iPod and QuickTime supported video formats. The latest version of Handbrake is 0.9.5, which is released on Jan, 13, 2011. Besides DVD, it can also convert videos like AVI and MP4 (Version 0.9.3 or later). It is a cross-platform DVD ripper freeware available for Mac OS X, Windows (Including Windows 8) and Linux. It supports batch encoding as well as one by one converting with good video quality.

However, it comes with a hard-to-use interface and many users are at a loss what to do. And for DVDs, this free Mac DVD ripper can only rip standard DVDs that can be played on your home DVD player without any third party software. So if you want to rip some commercial DVDs with Handbrake, you may feel frustrated. Another disadvantage of Handbrake is that it is not stable and sometimes crashes.


2. DVDFab HD

DVDfab has a comfortable blue interface, but it is not user-intuitive when it comes to operation. DVDfab DVD Ripper is good for those who would like to have external subtitles and 2 audio languages (MKV only), or those who want to rip a DVD to iPad MP4 and MKV at one time- this app queues up your conversion tasks and it pops up settings/queue box each time a chapter is selected (this makes the operation kind of misleading). There’re some presets for Android smartphones and tablets, and you’re allowed to custom your own format to utilize the screen of your tab. Overall, DVDfab is a nice choice for ripping DVD to MP4/MKV with multi-streams.


3. Aimersoft DVD Ripper for Mac


Aimersoft DVD Ripper for Mac is recommended because it is an amazing tool with many useful functions. With it, you are able to rip as well as convert DVDs to almost every audio and video format such as MP3, MOV, WMV, MP4, AVI, WAV and much more. It can carry out these tasks while bypassing the copy protection. It comes with 150 and more presets for many portable media players, including Android smartphones, game devices, Apple products, etc.

4. Magic DVD Ripper

You can use this tool to detect and import DVD files automatically from optical drive. It has enough common video formats, including WMV, AVI and MP4, for the average users. There are also 32 presets, but these are not enough for Android users. This tool might not deliver the original features, but it is still a nice tool for burning and copying DVDs.


5. Aiseesoft DVD Ripper for Mac


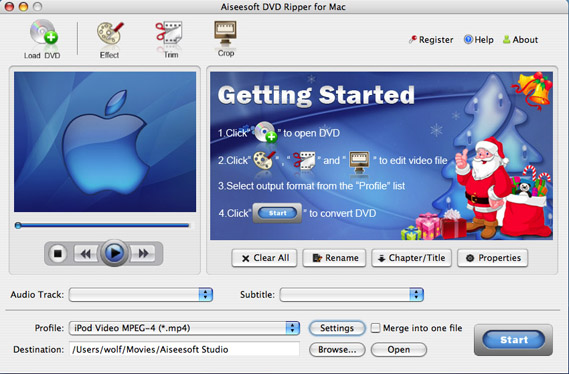
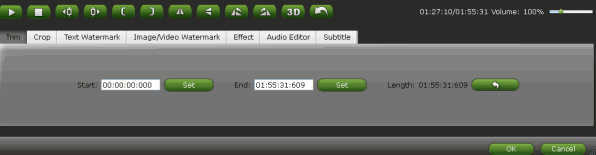
The Aiseesoft DVD Ripper is a satisfactory application to use when you need to copy movie DVDs to computer, rip DVDs to videos or audios of any format so that you can enjoy them on your portable device like PSP, iPod, iPhone, iPad(iPad2), Zune, Blackberry, Creative Zen, Apple TV, Xbox, etc. The software does a good job working out the presets for popular Android smartphones (e.g. Samsung Galaxy S2, Samsung Galaxy S3, Samsung GALAXY Note 2), yet not so good in terms of Android tablets- still lacking of presets to specific Android tabs. This DVD converter comes with creative editing tools, so you can customize output movies by trimming, cropping, watermarking, etc.

Conclusion: So there are some best DVD Ripper software for Mac. While, searching online we find there are still many users are looking for a more professional DVD Ripper for Mac, especially on Mac E1 Capiatn. That's because most of the free DVD Ripper software hasn’t updated with the support for Mac E1 Capiatn. What’s more, there are so many limits with these free DVD converting programs like limited output formats, heavy quality loss, slow conversion speed... and can't meet the needs of users.

If you want to rip all the latest copy-protected DVDs and need HD supporting, subtitle adjustment and more personalized settings from the DVD Ripping software, Brorsoft DVD Ripper for Mac will be an excellent choice for you.

With running it, you can rip and convert any protected DVD, DVD ISO, VIDEO_TS to almost any video format including not limited to MKV, MOV, MP4, AVI, WMV, M4V, MPG, 3GP, FLV. It also comes with a bunch of optimal presets for Galaxy Tab, Nook HD, iPad, Apple TV, PS Vita, Nexus 7, Surface tablet, Nexus 10 etc iOS, Android, Mac based media devices. Meanwhile Brorsoft provides excellent customer support service, including lifetime free upgrade of product and technical support. Users can contact the support staff via email for help and suggestion.


Main Interface:


Thursday, November 19, 2015

How to Import Video_TS to Final Cut Pro for Editing?

Summary: This article aims to help you how to convert Video_TS folder to Final Cut Pro for editing with the Best Video_TS to Final Cut Pro Converter on Mac.


VIDEO_TS files are one of the main folders in a DVD's contents. You can usually view the Video_TS files on your computer and DVD players. But if you want to import Video_TS files into Final Cut Pro for further editing, you will be disappointed to find Final Cut Pro cannot read them with popping up a box showing message like "Incompatible Video Format". Fortunately, there is an easy way to fix this issue. Let's find it out here.

In fact, what's in the Video_TS folder is MPEG-2 in VOB, which is not included in ths FCP supported video list, and that's basic reason why Final Cut Pro always refuses Video_TS files and the VOB files in Video_TS folder grey out. So if you stick to transferring Video_TS files into Final Cut Pro (FCP X Included) for further editing, you'd better convert Video_TS to FCP more edit-friendly video format like Apple ProRes MOV initially. To finish the task smoothly, a Video_TS converter is required. Here the Brorsoft DVD Ripper for Mac is highly recommended for you.

With it, you can effortlessly convert Video_TS to ProRes MOV, which ensuring the maximum editing efficiency and quality when work with Final Cut Pro, with fast converting speed while keeping the excellent quality. Besides converting Video_TS files, it can also you help you convert various video formats such as VOB, MXF, MTS, AVCHD, M2TS, XAVC, XAVC S, AVI, MKV, etc. Now download the program and check out the steps below.

How to convert Video_TS files to work in FCP

Step 1. Load VIDEO_TS files to the converter

Run the VIDEO_TS to Final Cut Pro Converter and click "Load DVD" to import the VIDEO_TS files you want to convert. DVD disc, ISO image files are supported as well.


Step 2: Select output format

When it comes to choosing the output format for these target videos, you directly one choose "Final Cut Pro" preset. For compression, Apple ProRes 422 will do fine for keeping the original quality the same and creating a Final Cut friendly file format. Apple has made a few variations to the ProRes family - use ProRes 422(Proxy) or (LT) for smaller file sizes(Applied to FCP 7 and above version).


Step 3 (optional): Adjust the video, audio settings

Click "Settings" to fix the frame rate, bitrate, video size, etc to your needs. If you want to edit in Final Cut without having to render the clips while editing, all the frame sizes must be the same as the sequence settings. You can save a lot of render time by making all the clips the same size with this Mac Video_TS converter.


Step4: Start Video_TS to ProRes conversion on Mac

Click the big "Convert" button at the bottom right corner to finish transcoding MP4 to ProRes for FCP.

When the conversion is done, you can find the output files by clicking "Open" button on the main interface, then you can transfer the encoded Video_TS files to your Final Cut Pro, FCP 7 or 6 to edit with ease. Once you've got your video edited, you can export to any codec/container that you'd like for playing and sharing.

Tuesday, November 17, 2015

Convert and Stream DVD ISO to Apple TV for playing freely

Summary: Are you looking for a quick and easy solution to play DVD ISO files on Apple TV? This article offers you the best workaround to help you fix the issue.


An ISO file, often called an ISO image, is in fact an "image" of an entire CD, DVD, or Blu-ray. The entire contents of a disc can be perfectly represented in a single ISO file. Chances are you have downloaded or ripped some DVD movies with ISO extension , ever thought of importing them to Apple TV for a better visual experience though HD TV? Well this tutorial will offer you a quick and easy method to help you transfer DVD ISO movies to Apple TV without any hassles!

As we know, the supported format of Apple TV is limited, and the MP4 format is the perfectly friendly format for Apple TV, thus, if you wanna transfer the ISO files to Apple TV, first you need to do is to convert these ISO files to MP4. To convert ISO to MP4, what you need is a professional ISO to MP4 converter for Apple TV. ISO to Apple TV Converter for Mac, a powerful ISO extracting and ripping software, can help you easily rip ISO to MP4 for Apple TV on Mac OS X with fast speed and excellent output quality. That's where Brorsoft DVD Ripper for Mac comes in.

Overall, this Mac DVD ripping program enables you to rip and convert DVD disc, DVD VIDEO_TS folder, DVD ISO/IFO files to MP4 as well as all popular video formats like MOV, MKV, FLV, 3GP, MTS, VOB, etc and even extract audio from DVD movies. It takes some time to make the conversion, but then you will have a compressed version of your DVD ISO file that will take up a little more than 25 percent of the hard drive space the original file did. If you are using Windows, Brorsoft DVD Ripper is designed for you. Just download the software and follow the guide below to convert DVD ISO to a Apple TV format you need.

How to Convert DVD ISO to play on Apple TV


Step 1: Import DVD ISO/IFO files to DVD to Apple TV Converter for Mac.

Launch the best DVD to Apple TV Converter for Mac. Click the ISO/IFO button to add DVD ISO/IFO to it. If necessary, you can double click the each file to have a preview.

Tip: Freely select the subtitles for you DVD movies from the “Subtitles” option. Thus, you can put DVD movie onto the Apple TV with preferred subtitles.

Step 2: Select an output format for the Apple TV and set the output folder.

Click on the dropdown menu of “Format” and then move your pointer to “HD video > “H.264 HD Video (*.mp4)” which is the compatible format for Apple TV. You can also choose the format from the “Apple TV” sublist, which are all compatible for the new Apple TV. Then you can set the output folder by clicking “Browse” icon as you need.

Step 3: Click “Settings” icon to adjust audio and video parameters.

Click the “Settings” icon and you will go into a new interface named “Profile Settings”. You can adjust codec, aspect ratio, bit rate, frame rate, sample rate and audio channel in the interface according to your needs and optimize the output file quality.

Tip: Though the new Apple TV can support H.264 video up to 1080p, 30 frames, 720*480 is the best video size to set here due to the source DVD movie’ s native resolution.

Step 4: Start converting your DVD ISO/IFO to MP4 for the Apple TVon Mac.

Click the “Convert” button; it will rip DVD ISO/IFO to MP4 for the Apple TV on Mac immediately. You can find the process in the “Conversion” interface.


After DVD ISO/IFO to MP4 for Apple TV conversion, you can get the output files for Apple TV via clicking on “Open” button effortlessly. Now you can sync/copy DVD ISO/IFO to the Apple TV on Mac freely. You should know, for streaming media from a Mac, iTunes must be 10.6 or later. And to get 5.1 sorround sound, AV Reciever is necessary.

Stream ripped DVD ISO on Apple TV via AirPlay or iTunes:

Via AirPlay:

Firstly, to use AirPlay, you need to prepare one of the following devices: iPhone 4 (or later), iPad, iPad mini, or iPod touch (4th generation or later). Add the ripped DVD ISO movies to iTunes and sync to your iOS device.

Secondly, be sure iOS device and Apple TV are in the same Wi-Fi network; start play the video on your device, and then swipe up from the bottom of your device screen to access Control Center and tap AirPlay;

Thirdly, tap the name of the device you want to AirPlay to.

Via iTunes:

Firstly, add the ripped DVD ISO videos to iTunes. Then, go to iTunes > Preferences, choose Apple TV, and make sure "Look for Apple TVs" is selected.

Secondly, on your Apple TV, choose Settings > Computers > "Connect to iTunes," and note the passcode displayed; in iTunes, select the Apple TV (below Devices), and enter the passcode.

Thirdly, click the Summary button and select one of "Automatic Sync" and "Custom Sync".

After all the operation, you should be able to Play DVD ISO through Apple TV on HD/Smart/3D/4K/ TV freely. Just enjoy now!

Sunday, November 15, 2015

Rip and copy DVD to Chromebook 2 for easy playback

"Recently i have bought a Toshiba Chromebook 2 and it's amazing! I happen to have a bunch of DVD collections and then i wonder there is possible to enjoy my funny DVD movies on this Chroembook 2 for a better visual experience! thanks in advanced."


Chromebooks is light, inexpensive notebooks built for online computing. These small laptops have just 16GB of internal storage and connect to the Google Drive, where you can store your videos, music and pictures.Chances are you have purchased some DVD collections, ever thought of importing them into Chromebook 2 for easy playback? If you are in such demand, you won't miss this article!

In fact, since Chromebook 2 owns relatively smaller hard drive capacity, with no drives, you cannot directly watch DVD movies on Chromebook 2. So what if you want to play DVD on Chromebook 2? The recommended suggestion is to rip and convert DVD to Chromebook supported video format like MP4 initially. To be honest, it is easy and worth your effort as long as you have a professional DVD to Chromebook Converter program like Brorsoft DVD Ripper.

It is a quite professional DVD ripper, which comparatively has better output quality and intuitive interface. With it, you can convert DVD to Chromebook 2 friendly video formats with easy operation and high output quality. And one best advantage of this DVD ripping software is that it provides kinds of optimal video presets for Android, iOS, Windows based portable devices like iPhone, iPad, Samsung Galaxy Tab, Google Nexus 7, Nook HD, Apple TV, Surface Pro, etc. The Mac equivalence to convert DVD to play on Chromebook is DVD Ripper for Mac. Now, we will give a detailed guide on the whole process from converting DVD videos to Chromebook supported video.

Convert DVD for Chromebook playback without quality loss

Step 1: Run DVD Ripping tool; click disc button to import DVD movies to the program. Then select the titles you want to rip.


Tip: After the movies are loaded, select the subtitles you like, simply click Subtitle and select the one you prefer.

Step 2: Click Format bar and choose your desired format. In most cases, MP4 format is recommended to users. It could fit on your Samsung, Acer, HP and Toshiba Chromebooks.


Tip: You can click Edit to crop the DVD so as to get the part you want and get rid of some black bars or trim some parts off.

Step 3: Click Convert to start converting DVD files to Chromebook. After the ripping, just transfer the converted DVD to your Chromebook and enjoy them anytime you want.

Thursday, November 12, 2015

How to Rip and Convert DVD to Final Cut Pro X/7/6 freely

Summary: If you want to import DVD videos into Final Cut Pro for further editing, you will definitely right here! This article aims to fix FCP cannot open DVD issue.


As a powerful and easy-to-use video editing tool, Final Cut Pro is widely used by either professionals or newbies. In general, the one you choose is mainly based on the source material. Then there are maybe some occasions you find youself facing DVD as source video for a project or need to do some modifications on DVD collections via the help of Final Cut Pro. And in this article, i will show you how to import DVD files to Final Cut Pro for creating your own masterpieces freely.

Whether it's for wedding video, a sport highlight film, or some other project, more and more people have their video footage on DVDs these days. But when they tried to import DVD to Final Cut Pro, they may usually find that the DVD files grey out. Why? That's because Final Cut Pro only supports DV, HDV, P2 MXF (DVCProHD), XDCAM, and 2K film formats, but obviously DVD is not included. If you also are looking for ways to load DVD to Final Cut Pro for further editing, you'd better to convert DVD to Final Cut Pro compatible video formats initially.

The current software options for ripping a DVD movie to Final Cut Pro are virtually endless. The most used software for us is Brorsoft DVD Ripper for Mac. By running it, there's no need to set the codec by yourself: the Mac program has optimized presets for Final Cut Pro. With it, you can easily extract desired clips from DVD for editing in Final Cut Pro X/7/6. Besides, the program also supports convert DVD to almost any video formats like MKV, MOV, AVI, WMV, MP4, FLV ,etc. with fast ripping speed and high output video quality by passing DVD CSS protection. Just get it and follow the steps to complete your task.

How to Convert DVD movies to ProRes MOV for editing in Final Cut Pro

Step 1. Load DVD movies

Install and run the Mac DVD to FCP Converter; load the DVD movie from your Mac or DVD Driver. Alternatively, you can hit "IFO/ISO" button to import IFO files. In a minute, your DVD files will be listed at the main panel.


Step 2. Select output format

Clicking "Format" bar and choose Apple ProRes 422 (*.mov) as output format from the "Final Cut Pro" category.

Tip: To have a smooth playback and editing after conversion, for FCP 6, you can only choose ProRes 422 and ProRes 422(HQ) as export format; while, for FCP 7 and FCP X, ProRes 422(LT)/ProRes 444/ProRes 422(Proxy) are all supported.


Step 3. Start the DVD to Final Cut Pro Conversion
After finish the above steps, start ripping DVD to ProRes for FCP 6/7/X on Mac by clicking Convert button.

After the conversion, open Final Cut Pro; choose Import from File menu, and select files or file folder to navigate to the output files. Click "Choose" to import DVD to Final Cut Pro. Now, you have successfully imported DVD to Final Cut Pro. You can edit your treasured DVD videos within Final Cut Pro freely as you like.

P.S. Brorsoft DVD to ProRes Converter Mac offers optimized DVD video editing functions, empowering user to crop video file size, trim video segment, merge video files and so on to realize different needs.

Tuesday, November 10, 2015

Backup DVD to QNAP NAS for DLNA streaming

Summary: If you are still looking for a workaround to rip and backup your DVD movies to your QNAP NAS server fro DLAN streaming, then you won't miss this article.


QNAP is famous for NAS server. And the DLNA Media Server can turn your QNAP NAS into your home’s multimedia streaming server. As long as you have devices that support DLNA (for example, Samsung Galaxy Tab, PlayStation 3 system, XBox One or even camcoders), you can directly browse and stream the pictures, music and videos stored on your QNAP NAS. Chances are you have a bunch of DVD collections in hand, may also wanna backup them into QNAP NAS for streaming anywhere, right? If you are in such demand, you will definitely right here! This article i will show you a quick solution to help you backup DVDs to QNAP NAS for the purpose of DLNA streaming.

Learn some tips from online, I got know that to copy dozens of DVD movies to QNAP NAS, you need to get the content off the DVD disc as a protection-free and easily readable element for QNAP NAS. In this case, at the first place powerful third-party software for backup DVD to QNAP NAS is what you need. There are many, many DVD ripping tools on the market. I’ve tired a pile of them. Brorsoft Blu-ray Ripper is the best one I’ve tried yet. It is capable of ripping DVD to MP4, AVI, MKV for QNAP NAS streaming with no quality loss.

With this program, you can decrypt DVDs and lossless re-encode DVDs to MKV, MP4 format and compress 1080p DVD to compatible size for QNAP NAS. Of course, this Blu-ray ripper can help you convert commercial Blu-ray/DVD movies to AVI, WMV, FLV, MOV, FLV, MXF etc as well. What's more, it can also enable you to rip Blu-ray/DVD for directly playback on Android, iOS, Windows based devices. If you are using Mac, you can also use the Blu-ray Ripper for Mac OS X.

How to Rip DVD movies to QNAP NAS Device for DLNA Streaming 

Step 1: Load DVD movies

Install and launch DVD to QNAP NAS Converter, and then click the disc icon to import your source movies to this program. Set your wanted subtitles and audio track from the drop-down box of "Subtitles" and "Audio" tab.


Step 2: Select an output format

To convert DVD to MP4, MKV for QNAP NAS storing and streaming, just click on the dropdown menu of "Format", and then choose MKV, H.264 MP4 from Common Video profile list. If you want to keep 1080p resolution as source movie, you can choose HD Video > H.264 HD Video(*.mp4) or MKV HD Video(*.mkv) as output format.


Tip: If you like, you can click "Settings" to change the video encoder, resolution, frame rate, etc. as you wish. Keep in mind the file size and video quality is based more on bitrate than resolution which means bitrate higher results in big file size, and lower visible quality loss, and vice versa.

Step 3. Rip DVD movies to QNAP NAS

Click the convert button under the preview window, and the Blu-ray ripper will start the conversion from DVD movies to MKV/MP4 for QNAP NAS and media player.

After the conversion, you can hit "Open" to quick locate the converted video; now you can stream converted DVD files through QNAP NAS to HDTV, Android tablet, DLNA device or other HD media player for wide sharing.

Sunday, November 8, 2015

How can we Make ISO Files work with Premiere Pro

Summary: This tutorial will teach you how tomake ISO image file compatible with Premiere Pro so that you can freely edit ISO files on Premiere Pro to get your own masterpiece.


An ISO file is an archive of one or more files represented by a single image file. If you want an exact copy of a group of files to reproduce for future use, ISO is the way to go! However, it is difficult for NLEs like Premiere Pro, Final Cut Pro, Avid Media Composer, iMovie, etc to extract its main file for editing in that an ISO image contains all contents of the disc, such as menu navigation, the main movie, every single track and information about the structure of the disc.
In this page, we will only focus on how to fix ISO image file to Premiere Pro issue.

Actually, it's not so hard to do the trick. One of the solutions is to burn .ISO to disk and then copy the .VOB files to your hard disk and import those into your Adobe project. Another easier and faster solution is to change ISO files to Adobe Premiere Pro natively supported format, and MPEG-2 is usually ideal. Brorsoft DVD Ripper for Mac is just what you need to achieve your goal.

As a Mac friendly program, its user-friendly interface and powerful capacity is suitable for both novice and pro alike Mac users. You can effortlessly convert ISO image files to MPEG-2 favored by Premiere Pro on Mac (including OS X 10.9 Mavericks, 10.10 Yomesite and 10.11 E1 Capiatn) while keeping the excellent output quality. Besides Adobe Premiere, this software can also export Apple ProRes, AIC, DNxHD for Final Cut Pro, iMovie, FCE, Avid Media Composer and more NLE systems. For Windows users, get the equivalent Windows version Brorsoft DVD Ripper. Now download the software and follow the guide below to complete your task.

Convert DVD ISO image to Adobe Premiere Pro

Step 1: Load ISO files to the program

Launch the ISO to Premiere Pro Converter and click "Add File" button to locate the ISO file(s) you want to add. Check the "Merge into one file" box, you can join several .iso clips together if necessary.


Step 2: Choose Premiere preferred format

Click "Format" pull down list to select Adobe Premiere/Sony Vegas> MPEG-2(*.mpg) as the best video format for Premiere Pro.


Step 3: Adjust the video, audio settings

Click "Settings" to fix the frame rate, bitrate, video size, etc to your needs. To have a smooth editing with Adobe Premiere Pro, you need create the files with the appropriate resolution and frame rate that matches your source footage.

Step 4: Start ISO to Premiere Pro conversion

Click the big "Convert" button at the bottom right corner to finish encoding ISO files to .mpg for Adobe Premiere Pro CS5/CS6/CC on Mac OS X.

When the conversion is done, you can find the output files by clicking "Open" button on the main interface, then you can transfer the converted ISO files to Adobe Premiere Pro to play and edit without any problem.

Thursday, November 5, 2015

Detailed Guide on How to Play Video_TS on PC/Mac

Summary: This article will teach you how to smoothly play Video_TS folder or files on PC or Mac.


What's the Video_TS? If you have ever backed up a DVD to your computer, or have download movies or videos from torrents, then you are likely familiar with the file structure. It is a DVD folder file, mainly containing all data for the DVD movies. It totally contains three kinds of files inside: VIDEO_TS.IFO, VIDEO_TS.BUP, and VIDEO_TS.VOB.

Why can't we play Video_TS files directly on PC/Mac? That's because inside the Video_TS folder or files, the Video_TS VOB is the actual video and audio data for DVD content, but the VOB of the Video_TS files are not fully compatible with PC/Mac. Therfore in this page i will introduce two effective methods to help you play easily Video_TS files on Windows and Mac.

How to play Video_TS files on PC/Mac smoothly? In fact, it is easy and worth your effort! One way is to have the best video player software like VLC Player that supports VIDEO_TS files playback, the other way is to convert VIDEO_TS files to playable format for media players. If you have no idea, just follow with me and let me walk you through the process.

Solution 1: Use VIDEO_TS Player

You can easily playback your VIDEO_TS files if you have a VIDEO_TS player installed. VideoLAN (VLC Player) will be one of your alternatives. Download this player and follow the below steps to player your VIDEO_TS files.

Step 1. To play a copied/ripped DVD(VIDEO_TS files) from hard disk you can use VideoLAN (VLC Player): Click here to download this player.

Step 2. Install it. Start VideoLAN (click Start -> Programs -> VideoLAN -> VLC Media Player)

Step 3. Click File -> Open Directory. Find the VIDEO_TS folder, select it and click OK.

Please note, you have to copy all the ripped data to the right place. Create a VIDEO_TS folder and copy all the ripped files there.

Solution 2: Convert VIDEO_TS to other formats

In order to play VIDEO_TS on Windows (10), or other Android, iOS based tablet or phones, you’d better convert your VIDEO_TS file to a compatible format for playback on your current player. You can try Brorsoft DVD Ripper.

Overall, this DVD ripping program enables you to rip and convert DVD disc, DVD VIDEO_TS folder, DVD ISO/IFO files to all popular video formats .wmv, .avi, .mp4, .mpg, etc and even extract audio from DVD movies. Besides, the built-in video editor allows you to trim, crop, add watermarks, etc. to get the very part and effect you want. If you a Mac user, please turn to the Mac version - DVD Ripper for Mac. Just get the right version and follow the guide below to convert VIDEO_TS to a video/audio format you need.

1. Load VIDEO_TS files to the converter

Run the VIDEO_TS Converter and click “Load DVD” to import the VIDEO_TS files you want to convert.


2. Choose output format

For Windows Media Player, just convert the VIDEO_TS to WMV. As for playing VIDEO_TS in QuickTime, the MOV file type is recommended. Of course, you can choose to encode VIDEO_TS to avi, mp4, mkv, flv, etc.


3. Edit your VIDEO_TS files(Optional)

You can click Edit to trim, crop the DVD movies so as to get the part you want or add some special effect on your movie.


4. Start VIDEO_TS to Mac/PC conversion

Hit the “Convert” button to convert VIDEO_TS files in the lower-right corner of the interface. After the conversion, you can play your VIDEO_TS files in your native player easily and smoothly. Enjoy.

Tuesday, November 3, 2015

How to Convert Blu-ray ISO files to MKV/AVI/MP4...

Summary: This article will teach you how to convert Blu-ray ISO files to MP4, MKV, AVI, etc popular video formats for the purpose of more convernient playback and sharing.


A Blu-ray ISO file is an exact copy and contains the entire information and contents of a Blu-ray disc. Maybe you have ripped some Blu-ray movies to Blu-ray ISO files or downloaded some BD Blu-ray ISO images from the Internet and now want to convert them to .MP4, .AVI, .MKV, etc format for more convenient playback or sharing? You are in the right place; we will guide you to convert Blu-ray ISO to kinds of popular video formats.

As we all know, though Blu-ray ISO Image provides high-quality video effect, but ISO file is not supported by most players, tablets, phones and video editing software. So if you want to share, watch, edit Blu-ray ISO videos smoothly and easily, then converting Blu-ray ISO files is really necssary. To accomplish the task, you need the help of a Blu-ray ripper that is capable of converting Blu-ray ISO image files. Here Brorsoft Blu-ray Ripper is highly recommended as the best Blu-ray ISO converting program to help you get your work done.

With it, you can effortlessly convert Blu-ray ISO files to MP4, AVI, MKV, MOV, WMV, FLV, VOB and more for using in any regular players, video editors or online websites. In addition, you can edit your ISO files by cropping, trimming, adding watermarks, etc. with the built-in free editor. If you're using a Mac, just get Blu-ray Ripper for Mac, which allows you to rip ISO on Mac OS X (including EI Capitan, Mountain Lion and Mavericks). Now download the right version and follow the step-by-step guide below to finish your task.

How to Convert Blu-ray ISO to MP4, AVI, MKV...

STEP 1. Load ISO files to the converter

Run the Blu-ray Ripper and click Blu-ray icon to add ISO movies from your computer. All the loaded files will be listed on the left item bar and you can preview them on the right as the picture below shows.


STEP 2. Choose output format[b]

Click Format bar to get the format list and select a proper export format. As you can see, various regular video formats like MP4, MOV, MKV, FLV, WMV, AVI, etc. are available in the Common Video profile.

[b]Tip
: If you want to convert ISO for portable device or editing program, you can directly select the preset profile like iPad, Sony Vegas, Premiere Pro, Final Cut Pro, iMovie, Final Cut Express.


STEP 3. Start to convert ISO image files

After all these have been prepared, just click the "Convert" button to begin the Blu-ray ISO to MP4/AVI/MKV, etc conversion.

After that, click Open button to get the output video clips and play, edit, share them anywhere you like.

Sunday, November 1, 2015

Losslessly Compress DVD to MKV

Summary: This article introduces a best DVD to MKV Ripper to you for the purpose of ripping and compressing DVD to MKV files with smaller size while keeping the excellent quality.


Whether it's for a wedding video, a sport highlight film, a video game demo, or some other project, more and more people have their video footage on DVDs (only) these days. However, most DVD movies are carried with more copyright protection including region code, APS, CSS, UOP, etc which will put limitation to play DVD at will. Sometimes you may rent some funny DVDs from Netflix, but only allows you keep watching for a short time, unless you pay for it again. Why not simply backup them to hard drive in an MKV container so that you can watch them whenever you want to and share them to more friends. In fact, it is easy and worth your effort, just let's to walk you through the process quickly.

Editor's note: Why we choose MKV rather than AVI, MP4, MOV and other formats? - MKV is the only format which is capable of holding unlimited number of video, audio and subtitle tracks, along with any metadata. Practically this means it is possible to put an entire movie with multiple sound and subtitle tracks and movie thumbnail into single MKV file. Menus and chapter structure can be preserved as well.

In order to finish the task, you need to take advantage of some third-party programs. Luckily, there are a hugh amount of DVD to MKV Ripper tools in the current market like MakeMKV. which can help people backup DVD to MKV without any quality loss,but it’s not favorable by everyone. The thing is, DVD videos bites up too much space(a standard DVD disc with a 1-2 hour movie on it usually is around 7-8 GB). It is good to have a MKV movie of DVD quality, but not so good when the MKV movie is of DVD size. Unfortunately, MakeMKV does losslessly DVD to MKV backup only. It is not capable of compressing DVD - that’s probably the defect of MakeMKV. Then there is a great necessity to look for a best alternative to MakeMKV, here i strongly recommend you try the Brorsoft DVD Ripper.

Overall, it does everything MakeMKV does and also shrink DVD to MKV container format with multiple audio tracks/subtitles, and chapter information preserved. In a word, it is more than an alternative of MakeMKV. If you are a Mac user, you can turn to the Mac version - Brorsoft DVD Ripper for Mac. Now just download the right program and follow the easy guide below to rip and compress DVD to MKV with a few clicks.

Convert and compress DVD to MKV

STEP 1. Import DVD files

Insert your DVD disc to the drive, then launch the DVD ripping software and click the "Load Disc" button to have the DVD content imported.


STEP 2. Choose MKV as output format

Select "MKV(Matroska) Video (*.mkv)" as output format from "Common Video" category under the drop-down list of "Format". If you want to get better HD video quality, just select "MKV HD Video (*.mkv)" from "HD Video" category.


STEP 3. Advanced Settings

Click the "Settings" icon, and you can adjust codec, bit rate, frame rate, sample rate and audio channel in the interface according to your needs and optimize the output file quality. For DVD movie source, there's no need for compressing(It is relatively a small file size). Just keep the video size as original(720*480). And upscaling the video size won't make any difference of your video quality.

STEP 4. Start ripping DVD to MKV

Hit the "Convert" button at the bottom of the main interface to rip DVD to MKV. Minutes later, you can click "Open" to quickly find the converted MKV video. Just do what you want.