
An ISO file is an archive of one or more files represented by a single image file. If you want an exact copy of a group of files to reproduce for future use, ISO is the way to go! However, it is difficult for NLEs like Premiere Pro, Final Cut Pro, Avid Media Composer, iMovie, etc to extract its main file for editing in that an ISO image contains all contents of the disc, such as menu navigation, the main movie, every single track and information about the structure of the disc.
In this page, we will only focus on how to fix ISO image file to Premiere Pro issue.
Actually, it's not so hard to do the trick. One of the solutions is to burn .ISO to disk and then copy the .VOB files to your hard disk and import those into your Adobe project. Another easier and faster solution is to change ISO files to Adobe Premiere Pro natively supported format, and MPEG-2 is usually ideal. Brorsoft DVD Ripper for Mac is just what you need to achieve your goal.
As a Mac friendly program, its user-friendly interface and powerful capacity is suitable for both novice and pro alike Mac users. You can effortlessly convert ISO image files to MPEG-2 favored by Premiere Pro on Mac (including OS X 10.9 Mavericks, 10.10 Yomesite and 10.11 E1 Capiatn) while keeping the excellent output quality. Besides Adobe Premiere, this software can also export Apple ProRes, AIC, DNxHD for Final Cut Pro, iMovie, FCE, Avid Media Composer and more NLE systems. For Windows users, get the equivalent Windows version Brorsoft DVD Ripper. Now download the software and follow the guide below to complete your task.
Convert DVD ISO image to Adobe Premiere Pro
Step 1: Load ISO files to the program
Launch the ISO to Premiere Pro Converter and click "Add File" button to locate the ISO file(s) you want to add. Check the "Merge into one file" box, you can join several .iso clips together if necessary.
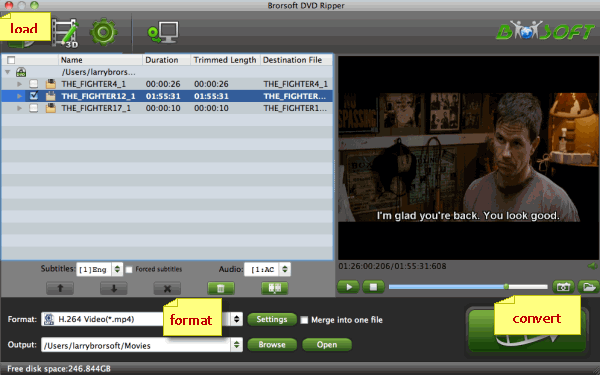
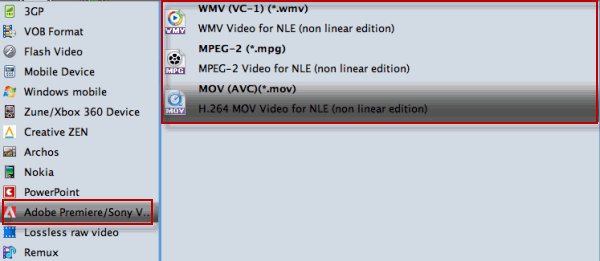
Step 2: Choose Premiere preferred format
Click "Format" pull down list to select Adobe Premiere/Sony Vegas> MPEG-2(*.mpg) as the best video format for Premiere Pro.
Step 3: Adjust the video, audio settings
Click "Settings" to fix the frame rate, bitrate, video size, etc to your needs. To have a smooth editing with Adobe Premiere Pro, you need create the files with the appropriate resolution and frame rate that matches your source footage.
Step 4: Start ISO to Premiere Pro conversion
Click the big "Convert" button at the bottom right corner to finish encoding ISO files to .mpg for Adobe Premiere Pro CS5/CS6/CC on Mac OS X.
When the conversion is done, you can find the output files by clicking "Open" button on the main interface, then you can transfer the converted ISO files to Adobe Premiere Pro to play and edit without any problem.
No comments:
Post a Comment