Pages

Friday, October 30, 2015

How to Rip and Copy Blu-ray/DVD discs in Windows 10

Summary: Ever tried to rip and backup Blu-ray/DVD movies on Windows 10? Come here and read on to find the solution.


Windows 10, as the latest Microsoft's operating system, brings a lot of convenience and efficiency to our Windows user for those amazing new features and what's more it's free to upgrade at the first year. At the meantime, however, it also takes away some utility functions like Windows Media Center and Blu-ray Playback, in other words you won't be able to import and play DVD/Blu-ray movies in Windows 10 directly. So here i will share some useful and effective tricks and tips with those who want to play their precious and funny DVD/Blu-ray collections on Windows 10 without any hassles.

As we all known, the main reason of we failing to transfer and play DVD/Blu-ray videos onto Windows 10 is the missing of native DVD/Blu-ray player. Therefore, there is a great chance that we need to look for a DVD/Blu-ray ripper that is compatible with Windows 10 to help you rip DVD/Blu-ray on Windows 10 without any hassle. However, the problem is many DVD/Blu-ray collectors are in trouble of ripping DVD/Blu-ray to hard drive for most of current DVD/Blu-ray Ripping software is seemingly incompatible with Windows 10. Well, it's actually not a big deal if you have a professional yet reliable DVD/Blu-ray Ripper like Brorsoft Blu-ray/DVD Ripper, which makes ripping and copying Blu-ray (DVD included) movies in Windows 10 as easy as a pie.

With it, you can effortlessly rip and convert DVD/Blu-ray to Windows 10 friendly readable video format with supper fast converting speed while remaining the original visual quality. In fact, this DVD/Blu-ray Ripper can convert DVD/Blu-ray to almost all other popular video and audio formats, including MP4, 3GP, AVI, MPG, MPEG-4, FLV, MOV, MKV, VOB, MP3, FLAC, MKA, OGG, WAV, AC3, M4A, etc. So you can play DVD/Blu-ray contents on iPad, iPod, Apple TV, iPhone, Samsung Galaxy S4, Google Nexus 7/10, Asus Infinity TF700, etc media devices and edit in iMovie, Final Cut Pro, Adobe Premiere, etc. If you are a Mac user, turn to the equivalent version - Brorsoft Blu-ray/DVD Converter for Mac, which can help you rip and convert DVD/Blu-ray to any video formats on Mac(OS X EI Capitan included). Now just download the right version according to your occasions and let me take you through the easy workflow of ripping and converting Blu-ray/DVD to Windows 10.

How to copy and import DVD/Blu-ray to Windows 10

Step 1: Add DVD/Blu-ray movies

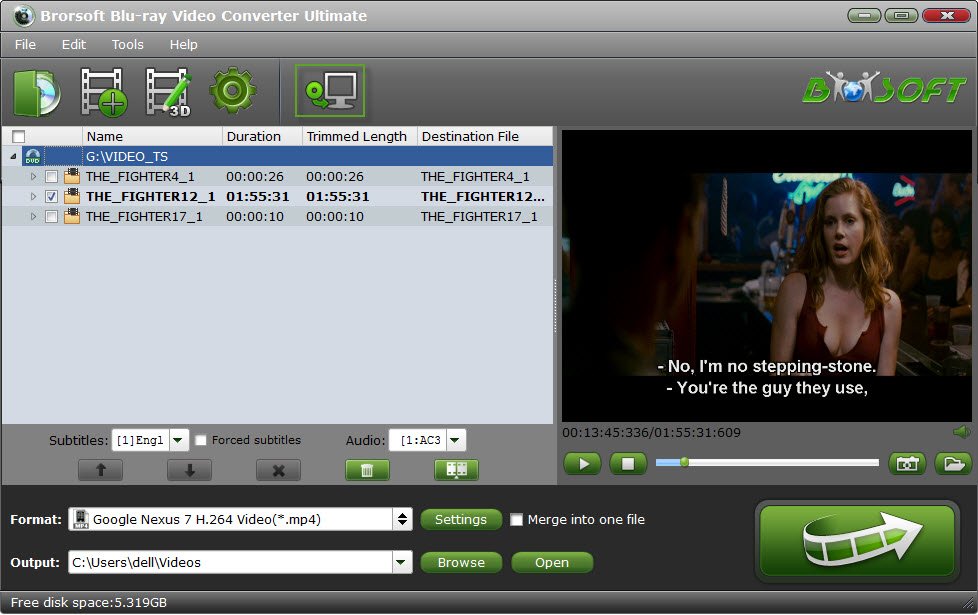
Insert the Blu-ray disc to the Blu-ray Disc drive or DVD to the DVD-ROM and click the Load Disc button to have movies uploaded to the Blu-ray Ripper. You can also import ISO files, IFO files or Blu-ray/DVD folder for conversion.


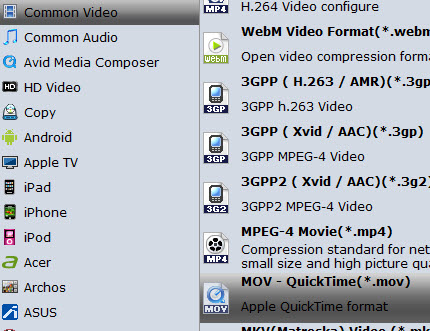
Step 2: Select output format

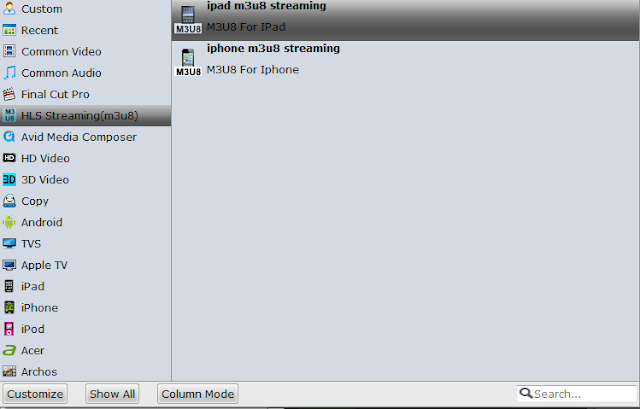
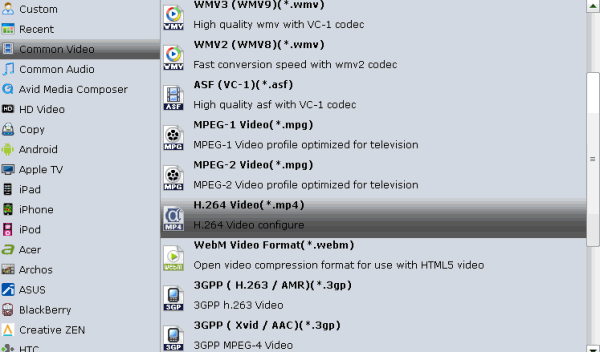
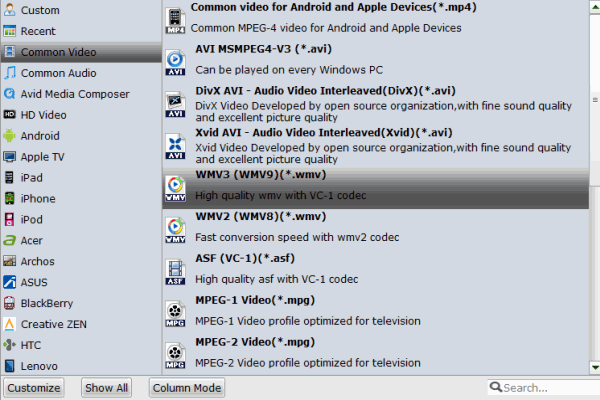
Click the Format bar and go to the Profile column, choose WMV, MKV, AVI, MPG, MP4, etc as the output video format in the category of "Common Video". You can also find lots of optimized profiles for many popular portable media devices including e Nexus 7, Galaxy Tab, Apple TV, iPad and more.


Tips: Adjust video/audio Settings (Optional)
If you want to customize output video quality in further, click Settings button to customize video quality like resolution, frame rate, bit rate, audio channel, etc.

Step 3: Start to convert

After above settings, click the big Convert button to start to convert Blu-ray/DVDs or video/audio files. As soon as the conversion is done, simply click Completed to back to main interface, and click Open button to find generated videos.

Wednesday, October 28, 2015

Convert Blu-ray/DVD to M3U8 for QuickTime playback

Summary: This article only focuses on how to convert and import Blu-ray/DVD to M3U8 Videos for easy playback on QuickTime.


QuickTime is a cross-platform multimedia architecture developed by Apple Inc, Available for Windows and Mac OS, it is used to handle digital video, audio, animation, text, and image formats. Although QuickTime can support a wide range of video formats, DVD/Blu-ray is not included. Commercial DVD/Blu-rays are encrypted and only special DVD/Blu-ray player software can open and display them. It's a pity that even your own (not encrypted) DVD/Blu-rays couldn't be played by QuickTime Player, either. As a QuickTime user, it's reasonable to watch your own DVD/Blu-ray movies (you bought or made by yourself) with QuickTime Player. Then what is the best method to transfer movies on a DVD to QuickTime movies? Read on this article, you will get the hints!

If you happen to have some Blu-ray/DVD collections in hand and actually want to play your wonderful Blu-ray/DVD videos on your QuickTime on Mac without waiting for the buffering time, then converting Blu-ray/DVD to M3U8 will be a wise choice for you! Since M3U8 files can be dragged to any point you want to enjoy smoothly and immediately for streaming online with a HTTP server. Besides, you can directly enjoy them with Apple's built-in player QuickTime.

Tips: Yeah, FFmpeg supports HLS protocols, therefore, you can create a HLS video stream format - m3u8(the basis for the HTTP Live Streaming format) with FFmpeg. However, the problem is that the latest FFMPEG version 2.0.1 only has support for HLS version 3, but not for HLS version 4 and version 5.

To solve FFmpeg generating m3u8 problems, it is idea for you to find a FFmpeg alternative for creating m3u8 files. If you do not want to waste your time to find a m3u8 creator, you might as well have a try at our software Brorsoft DVD/Blu-ray Ripper, which can perfectly convert the latest Blu-ray and DVD or ISO/IFO files to m3u8 format for playing with QuickTime, you can also build a local HTTP server to stream these files to your iPhone or iPad to enjoy with QuickTime player. Now, Just free download this ISO to M3U8 Ripper and get the step-by-step guide to finish the DVD/Blu-ray to M3U8 Conversion:

How to Encode DVD/Blu-ray files to M3U8 for Playing on QuickTime 

Step 1: Load DVD/Blu-ray files.

Launch the program and click Load button to import DVD/Blu-ray movies from disc, Folder, ISO/IFO files. As you see, all added files will be listed below and you can preview them, take snapshots.


Step 2: Choose output profile

Navigate the Format and set the output format as "HLS Streaming(m3u8) > ipad m3u8 streaming > iphone m3u8 streaming".


Step 3. Start ripping DVD/Blu-ray movies

Finally, click the Start button to start the DVD/Blu-ray ripping process. After the conversion completes, you can click "Open" to get the ripped media files. After that, you can enjoy them anywhere as you wish.

Monday, October 26, 2015

Download the Best MacTheRipper Alternative for Mac OS X 10.11 El Capitan

Summary: If you are looking for a effective alternative to MacTheRipper, stay on this page, i will share you the best alternative to MacTheRipper EI Capitan with you.


MacTheRipper is a world-famous DVD ripping freeware that helps to create a playable copy of the contents of a DVD by defeating CSS, UOP encryption and disabling region code of the copied data (the latest Sony ARccOS and Disney New X-project DRM not included). However something unhappy will happen to you if you want to rip DVD on Mac El Capitan with MacTheRipper, because this version does not keep abreast of the latest OS El Capitan. Frankly, there is a way out. You can seek for an alternative to MacTheRipper for Mac El Capitan to settle the issue and you will be lucky enough to find one from this passage.

There are several great alternative out there, and the top outstanding one is Brorsoft DVD Ripper for Mac for copying protected DVDs on Mac. Besides that, there are some reasons why it can be seen as the MacTheRipper alternative and is much better than MacTheRipper as below.

First, the best Mac DVD Ripper tool has been constantly updated for running on EI Capitan perfectly. Second, compared with MacTheRipper only ripping the DVD menu and all to your computer in VOB formats. This MacTheRipper alternative for Mac El Capitan supports more output formats including MP4, M4V, MOV, FLV, AVI, WMV, MKV, etc. What's more, this replacement app for MacThe Ripper comes with a built-in video editor, enabling you to edit videos like trimming, cropping, adjusting video effects, etc. All the editing can be real-time previewed to ensure the video effect. Now download the best MacTheRipper alternative and learn a brief guide on how to rip DVDs with this smart MacTheRipper alternative program.

How to use MacTheRipper Alternative to Rip DVD movies on Mac OS X EI Capitan

Step 1. Load DVD movie files

Insert your DVD disc into DVD drive. Launch the top alternative to MacTheRipper Yosemite and click "Disc" button to import the DVD movies.


Step 2. Choose output format

Clicking the Format bar, here you can select MOV, MPEG-4, MPEG-2, MKV, WMV... from the Common Video profile list as the target format. Or you can choose a preset for you device like iPad.


Tip: You can also check the "Settings" box , and set video codec, video size, Bitrate, frame rate to get a decent video you want.

Step 3. Start the conversion

When all settings are done, what you need to do now is to click the big Convert button and the MacTheRipper alternative program will begin ripping DVDs in Mac OS X 10.11 El Capitan immediately.

Once the conversion finished, you can click "Open" to locate the DVD rips. Then, you can play or share DVD movies on Yosemite or iPhone, iPad, etc devices at ease with high quality.

Saturday, October 24, 2015

How to Play DVD with QuickTime on Mac

Summary: This article aims to teach you how to rip and convert DVD to QuickTime .mov file on Mac for easy playback anywhere as you like.


QuickTime is an extensible proprietary multimedia framework developed by Apple Inc, capable of handling various formats of digital video, picture, sound, panoramic images, and interactivity. The app is a ideal tool to play any video and media clips from personal resource and internet. But according to QuickTime supported format list, DVD video format (like VOB, Video_TS, ISO or IFO) is not included. So what if we want to watch our favourite DVD movies in QuickTime? How to Enable QuickTime play DVD Movies on Mac? Don't worry! This guide will provide a perfect solution.

Of course, most of us are not about to play iTuness ridiculous prices to watch movies and TV shows we already have on DVDs. Instead, we'll just rip those DVD discs to a QuickTime-friendly format like MOV. Only comes with some help from third-party software, it can be done effortlessly. And when speaking of DVD Ripping program, your primary concern may be how to keep the best compromise between high visual quality and less take-up of storage. In that case, Brorsoft DVD Ripper for Mac can fulfill your needs and provide perfect solutions for all the Mac users. It is an easy-to-use yet efficient tool to help you convert DVD to QuickTime MOV on Mac Mavericks, Yosemite even EI Capitan successfully and quickly.

Besides converting DVD to QuickTime, it also can convert DVD to almost all video and audio formats including AVI, MPEG, WMV, DivX, MP4, H.264/AVC, Apple ProRes, AIC MOV, RM, 3GP, MP3, WAV, WMA, RA, M4A, AAC, AC3, OGG, AU, etc. If you're using a Windows, turn to the equivalent Windows version - Brorsoft DVD Ripper to rip DVD to QuickTime MOV on Windows XP/Vista/10. Download the right version of the program below and follow the tips to finish the conversion in clicks.

How to Convert DVD to QuickTime MOV with ease

Step 1. Load DVD Files

After running this program, you can click DVD disc button to load DVD movies to it. You can choose the chapters you want to rip. You are also allowed to preview the movies.


Step 2. Choose output format

Click the Format bar and you can choose "Common Video -> MOV - QuickTime (*.mov)" as the target format. This format can be played well on your iTunes, iPad, Apple TV also.


Optional - Adjust video and audio settings

The DVD to QuickTime Converter allows users adjusting video and audio parameters before converting DVD to mov. Click "Settings" button, then you will be able to adjust video and audio settings in the following popup window, including codec name, bit rate, frame rate, sample rate and audio channel.


Step 3. Start to convert DVD to MOV

After everything is done, click "Convert" button to start ripping DVD to QuickTime MOV for playback easily.

The program adopts advanced audio and video in sync technology, which will guarantee you perfect audio and video synchronization. Once the conversion is done, you can click "Open" button to get the final output QuickTime files with ease. Now just play DVD movies with QuickTime Player as you like.

Thursday, October 22, 2015

Top 5 Free DVD Ripper for Windows 10/8.1/8/7


Summary: Are you looking for a free yet powerful DVD Ripping software to rip and convert DVD to other popular video formats for watching, editing, backuping or other demands, here we will show you top 5 DVD Ripper reviews. You can according to the reviews to choose the best DVD Ripper software by yourself.

Nowadays, DVD Ripping software are becoming more and more important and popular in our daily life for its powerful functions. With it, people can prevent their precious DVD movies form scratching and damaging by backuping DVDs, or use it to convert DVD medias to other formats for playback with portable devices in trip. However, there are a huge amount of DVD Ripper programs for Windows on the current market now and therefore it is quite hard to tell which one is good or suitable. So today, this article will introduce top 5 DVD Ripper Program for you on Market which will have the stronger functions that are enough to help your ripping requirements. Just hold on reading.

1. DVDShrink

DVDShrink is one of the most popular free DVD rippers that will effectively back up DVD discs. It has a sleek interface with a unique ability to compress 8GB dual-layer DVDs down to 4GB sizes. It has great compression functionalities that are optimized with more shrinking capacity and additional features like re-authoring. With its user friendly interface, DVDshrink will make your DVD ripping a breeze!


Pros: sleek and user-friendly interface; ability to re-encode and discard extra content; great compression functionality
Cons: has not been updated since its released and might not be able to decrypt some DVDs with newer copy-protection

2. HandBrake

Handbrake is open source software that provides an excellent quality of transcoded video. The program is also small in size albeit it is packed with great features that further improve synchronization and amazing video output quality.


Pros: excellent video quality output; small in size; support multi-platform
Cons: transcoding speed is slow; cannot rip protected DVDs unless paired with another software

3. DVDFab HD Decrypter

The HD decrypter enables you to remove all the DVD protections and part of Blu-ray protections. It also has the functionality to either copy the full disc or just copy the main movie. It is also flexible and customizable as you can edit the settings and get the special effects that you like for your video copy.


Pros: easy to operate; multiple settings
Cons: may not be able to support new protection scheme with latest DVDs

4. Format Factory

Format Factory is an all-in-one free video converter and DVD ripper. It comes with 4 cool skins and supports more than 56 languages, which make it very special among all the free DVD rippers. The intuitive interface enables you to find the conversion options easily. Besides, it allows you to convert DVD to lots of video formats including mobile devices video formats. Before starting the DVD ripping process, you can adjust video bitrates, size, add subtitle, watermark, etc. as you like.


Pros: supports all video file formats as well as other media files; lots of options for customization
Cons: annoying ads on interface

5. MakeMKV

MakeMKV is highly praised for its ability to quickly and easily rip DVDs and Blu-ray discs to high quality MKV files with a single click. The app has been in beta for a long time (years, in fact), which is just as well, since the developers promise to start charging for Blu-ray ripping once the app leaves beta. The app’s strong suits are that it’s fast, super easy, and cross-platform (the Linux version is available in the forums.) Plus, the app preserves all of the source disc’s information, including tracks, chapters, HD audio, menus, and so on. The app is completely free.


Pros: easy to operate; multiple settings
Cons: may not be able to support new protection scheme with latest DVDs; output format is limited to MKV

In Conlusion: All these five best DVD Ripper Softwares for Windows that you can use for FREE which will have the basic functionalities that are enough to help with your basic ripping requirements. But all these free DVD Ripping tool have some drawbacks like HandBrake cannot rip protected DVDs, Format Factory filled with annoying ads, MakeMKV only limited to MKV and etc. If you want to rip all the latest copy-protected DVDs and need HD supporting, subtitle adjustment and more personalized settings from the DVD Ripping software, Brorsoft DVD Ripper will be an excellent choice for you. Here is a brief how to.

Step 1: Run Brorsoft DVD Ripper and load your DVD movies to the program. Check the main movie for copying.
Step 2: Click “Browse” button to specify a destination folder for the output files.
Step 3: Click “Copy the entire disc”button to start copying DVD. Factually, “Copy the entire disc” function preserves the entire structure of an original DVD disc, so it contains the .m2ts or .vob streams.
Step 4: As soon as the copying task finished, you can click “Open” button to get the output videos.


Tip: In case you just wanna do movie only copy, you can choose “Copy” > “Directly Copy” from the Format menu to copy the .vob files only. After that, do remember clicking “Convert” button to do Movie-only copy. When the copying work is done, you are able to click “Open” button to get the output .vob files without any other extra contents.


Tuesday, October 20, 2015

Easiest Way to Copy Blu-ray/DVD Movies to iTunes Library

"Recently, i have purchased an extensive collection of Blu-ray discs, and i have iPone 6S, iPad Mini 4, iPad Air and Apple TV 4, then i want to download my favorite Blu-ray movies into iTunes 11 so i can enjoy on any devices at any time. There is possible to convert and copy my Blu-ray movies into iTunes 12.3 on Mac? Thanks in advanced."


In fact, iTunes could only recognize video files in MP4, MOV, M4V, which means you can't play Blu-ray/DVD on iTunes directly(Videos upon Blu-ray/DVD disc have been in High definition format, many are usually in. mts/m2ts file extension that is not based on apple iTunes). So if you are willing to watch Blu-ray/DVD movies on your iTunes or wanna sync to your iDevices, whatever iPad, iPod, iPhone or Apple TV, you'd better convert Blu-ray/DVD to iTunes video initially.

To complete the ripping, a tool is needed which you can use to remove the strict Blu-ray/DVD protection and region restrictions and rip Blu-ray movies to iTunes video very quickly while retaining great video quality. The current software options for ripping a Blu-ray/DVD are virtually endless. From free to costly, easy to complicated, the right ripping tool is completely subjective to the end-user. If you’re looking for ease of use, why not check out the Brorsoft Blu-ray Ripper for Mac, which is a clean and incredibly versatile Blu-ray ripping tool that can remove copy protection on a Blu-ray/DVD and rips Blu-ray/DVDs to your hard-drive.

Besides, it also can help you to convert Blu-ray, DVD to almost any other common video format such as VOB, FLV, WMV, AVI, MKV or backup the BD, DVD keeping the whole movie structure as you need. If you are running on Windows, please turn to the Blu-ray Ripper. Now just download it and follow the tutorial below to rip and import Blu-ray/DVD movies to your iTunes (iTunes 12.3) library.

How to Convert Blu-ray movie to iTunes with high video quality

Step 1. Load Blu-ray movies

Place the disc from the BD drive. Launch the Blu ray to iTunes converter; click disc button to import Blu-ray movies into the program. Loaded Blu-ray movies can be previewed in the right preview window.


Step 2. Decide on output format

Click the drop down box of "Format", through which it is possible to select iTunes highly compatible format like H.264 MP4, MPEG-4 from "Common Video" profile list. If you want to add the Blu-ray movie to iTunes for play on iPhone, iPad, iPod, Apple TV, etc., you can also directly select iPhone, iPad, Apple TV or iPod as the output format to get videos with optimized settings for your iDevices.


Tip: If you need, you can also click "Settings" to modify parameters of your output profile to meet your professional needs: bit rate, frame rate, aspect ratio, etc.

Optional: Edit Blu-ray movies

You can even use its provided Edit feature to edit your output video by cropping, adding watermarks, trimming and setting 3D effect so on.


Step 3. Start ripping Blu-ray to iTunes

The final step is to tap the Convert button and commence converting Blu-ray movies to iTunes files.

Step 4. add Blu-ray movies to iTunes

After the conversion, click on "Open" button to access to the videos you ripped. Open your iTunes and import the Blu-ray (now in iTunes friendly video format) to its Movies library by clicking File -> Add File to Library.


After that, you can transfer and watch Blu-ray on iTunes or your iPad Pro, iPhone 6S, iPad Mini 4, Apple TV 4 and more Apple devices freely. On Apple TV, I browse the iTunes library for the movie and it plays smoothly and at full quality. I don't think it could get much simpler (unless of course, Apple provides native support for Blu-Ray which doesn't seem

Sunday, October 18, 2015

How to Get DVDs to Stream to Roku 4/3 Easily?

Summary: Are you trouble of streaming DVD to Roku 4/3 for good playback or uploading? Don't worry, this article is a tutorial on how to stream DVD movies for Roku 4/3 for uploading and playing.


The Roku is a tiny box that connects to your television and allows you to stream video content from the Internet. Usually, if we have a Roku player at home, most users primarily use it to stream Netflix and Amazon Instant Videos. Ever thought of playing DVD in Roku player? Read on this article, i will share some tips and tricks with you.

Keep in mind that the Roku (either Roku 3 or Roku 4) only supports H.264 MPEG-4 certain common video formats and obviously doesn't accept DVD files. So if you are just planning to stream DVD medias to Roku 3, Roku 4, what you should do is to convert from DVD to MP4(h.264) in buck to solve the Roku and DVD incompatible issue. In other word, if you want to stream DVD to Roku 4/3 for playback, an DVD to Roku converter is needed.

Here Brorsoft DVD Ripper is the recommended DVD to Roku converter for you. With this program, you can rip DVDs and lossless re-encode DVDs to MP4 (H.264) for Roku 4/3 keeping the original video quality. Of course, this DVD ripper can help you convert commercial DVD movies to AVI, WMV, FLV, MOV, etc as well. What's more, it can also enable you to rip DVD for directly playback on Android, iOS, Windows based devices. If you are using Mac, you can also use Brorsoft DVD Ripper for Mac. Just download the right version and follow the guide below.

How to rip and convert DVD to Roku 3/Roku 4 Video Format

Step 1. Load DVD files

Install and launch the video converter for Roku. You can directly drag and drop the DVD files into the main window of this converter. Or add DVD files by clicking the "add" button.


Step 2. Select format for Roku

Click Format bar and choose Common Video > H.264 Video (*.mp4) as output format. MKV is also supported by Roku, so you can choose it. Why we recommend mp4 as the target format is that by packing the videos in mp4, the file size will be reasonable small and the video quality remains.


Tip: Roku does play MP4 files according to the relevant info in Roku official site. However, Roku just plays the MP4 files with H.264 video codec and AAC audio. Click the Settings icon to set the correct video, audio codecs.

Step 3. Convert DVD to Roku

Click the Convert button to start encoding DVD to Roku friendly video with the top DVD to Roku Converter. Then conversion won't take too much time if your video files are not too large. When the conversion completes, click Open to get the converted MP4 videos and now you've get all done.

Thursday, October 15, 2015

How to Play DVD in Windows Media Player

Summary: This article aims to teach you convert DVD to Windows Media Player WMV, so that you can freely play DVD movies in WIndows Media Player.


Sometimes maybe you encounter some occasions that when you trying to use Windows Media Player to play a DVD, but suddenly an error message pops out showing Windows DVD Player won't play this DVD directly, right? If so, just follow me and i will teke you through this issue.

After searching relevant imformation in Google, i come to realize that the basic reason why Windows Media Player failing to play DVD is that there are copy protection mechanisms present on most commercial DVDs. So is there an easy way to import DVD files to Windows Media Player? Absolutely yes! Just rip the disc and then convert the DVD video to the more manageable format (i.e. wmv) that Windows Media Player will read. On the otger hand, there are various DVD encryptions, can your DVD to WMV ripping tool possibly handle all of them? I know they are just a part of your concerns. But in a word, you are searching for a safe, clean, powerful yet reliable DVD to WMV ripper. Upon testing, Brorsoft DVD Ripper is the right one, fulfilling your demands.

Running it, you can effortlessly strip any commercial DVDs of their CSS encryption, and convert the movie files of DVD to whatever format you need sunch as WMV, AVI, VOB, FLV, MTS, XAVC, MOV, MP4, etc. And the software lets you tweak just about everything after you've got the movie from disc. Plus, it also provides pre-configurated profiles for those who intend to watch the movie on a handheld gadget including iPad, iPod, iPhone, Xbox, Galaxy Tab and more. don't hesitate to download it and read on the following step-by-step tutorials to finfish your task.

Steps to convert DVD to Windows Media Player

Step 1. Import PALY DVD

Install and run the DVD ripper. Insert the DVD disc into your computer drive and then load DVD files that you want to convert to the program.


Step 2. Select output format

Now, from the Format menu, select Windows Media Player friendly format as your output video format. There, you can take WMV as your output video format. If you prefer high definition videos, move your mouse pointer to "HD Video" and then choose HD WMV.


Step 3: Convert DVD to Windows Media Player file

Now, simply hit the "Convert" button at the lower right of the window and you're good to go. Depending on the speed of your machine and the length of your DVD movie, the full DVD to WMP video conversion will take anywhere from minutes to a couple of hours to do the rip.

Step 4: Put the ripped DVD movie onto Windows Media Player
Once you have converted your DVD to WMV format, Windows Media Player will be able to play the WMV.

Keep in mind, if you rip the DVD to another common format and playback it on WMP, you may hear audio but no video picture displayed, which means the video codec isn't installed. You need to install extrac codec pack to solve the issue. That's why we prefer to choose WMV, a format developed by Microsoft.

Tuesday, October 13, 2015

Easily Backup Disney DVD Movie on Mac OS X (El Capitan Included)

Summary: This is an instructive guide on how to easily copy or rip Disney DVD movies on Mac OS X (EI Capitan Included) for better backuping and playing Disney DVD medias.


As well as we know, Disney has produced and released countless popular and classic animation movies, leaving wonderful memories in our childhood. Maybe you are a Disney movie fan and have collected bunch of favorite Disney DVD videos. One day, seized by a sudden impulse, you are longing for reviewing those precious collections. However, when you insert the DVD disc into DVD player on Mac, only to find the DVD player rejects it because of being scratched, is it irritating, right? In fact, you can avoid this problem by making backup and copy them to your computer to prevent them from being scratched, and manage them in a more convenient way. This article aims at telling people how to rip and copy Disney Copy-Protected DVDs in an easy and quick way. Learn how to.

It is never an easy task to make backup of Disney DVD movie, as most of them are protected with latest encryption technology which prevents them from being copied or ripped. To fix this problem, we need to find powerful DVD copy software that is able to remove encryption to create Disney DVD backups, or convert to popular video formats. To flawlessly finish this task, here i strongly recommend you try the Brorsoft DVD Ripper for Mac (10.11 EI Capitan, 10.10 Yosemite, 10.9 Mavericks and more).

Overall, this DVD ripping software plays the best role as the Disney DVD movie backup tool. It takes everything from the Disney DVD, including the chapters, extras, and subtitles. With this DVD copy program, all these become easy because it is capable of copying any of your Disney DVD movies bypassing the latest DVD copy encryption. If you're using in Windows, turn to Brorsoft DVD Ripper, which lets you clone Disney DVDs on Windows (including Windows 10). Now just download the program and follow the steps below to finish your task.

How to backup Disney DVD movies effortlessly

Step 1: Run Brorsoft DVD Ripper for Mac and load your DVD movies to the program. Check the main movie for copying.

Step 2: Click “Browse” button to specify a destination folder for the output files.

Step 3: Click “Copy the entire disc”??button to start copying DVD. Factually, “Copy the entire disc” function preserves the entire structure of an original DVD disc, so it contains the .m2ts or .vob streams.

Step 4: As soon as the copying task finished, you can click “Open” button to get the output videos.

Tip: In case you just wanna do movie only copy, you can choose “Copy” > “Directly Copy” from the Format menu to copy the .vob files only. After that, do remember clicking “Convert” button to do Movie-only copy. When the copying work is done, you are able to click “Open” button to get the output .vob files without any other extra contents.


Additional Tips: Besides copying Disney DVD, this best Disney DVD backup tool also enables you rip and convert Disney DVD to WMV, MOV, MP4, AVI, FLV, M4V, MPEG, etc. Meanwhile, the program provides the optimized preset profiles for almost all popular multimedia devices and HD media players. So, you can choose to rip and convert Disney DVD to a common video for playing on computer, iPad, iPhone, WDTV, iTunes, Galaxy Tab are more. Enjoy your Disney movie anywhere.

Saturday, October 10, 2015

How to upload DVDs to iCloud for Streaming with iPad, Apple TV, iPhone

"Recently, i got some DVD movies and want to put them on iCloud so that i can stream them to my iOS devices wirelessly. But wneh i insert my DVD, iCloud cannot recognize it. Is there any way to help me transfer DVD medias to iCloud? Thanks in advanced."

iCloud provides its users with means to store data such as documents, photos, and music on remote servers for download to iOS, Macintosh or Windows devices, to share and send data to other users, and to manage their Apple devices if lost or stolen. Chances are you have a bunch of DVD collections and also wanna upload the DVD movies into iCloud so that you can enjoy your funny DVD movies in your iOS devices like iPad, iPhone and more without having to insert a DVD into a DVD player. However, it turns out that iCloud is not capable to store DVD movies. To transfer DVD to iCloud, you need to rip your DVD and convert DVD to iTunes compatible format because DVDs are CSS protected and you cannot directly copy them to iCloud. In this tutorial, i will share some useful tips and tricks with you.

Monday, October 5, 2015

How to Convert and Put DVDs on TiVo

This guide shows you the easy way to convert DVD to MPEG-2 so that you can play the DVD movie on your TiVo with ease.


TiVo is a brand and model of digital video recorder which works just like any other digital recorder, it let users can record or store TV programs. When a TiVo is connected to a home network, this device can also access videos stored on a PC. TiVo owners can stream home videos to TiVo box quickly by using a free program called "TiVo Desktop". Have you ever thought watching super clear DVD movies instead of HD home videos on TiVo box? Is it possible to put a protected commercial DVD on TiVo box?

In fact, it is not as hard as you imagine as long as you get a professional and reliable DVD Ripper, which has the ability to rip and convert videos from a DVD to TiVo friendly video format such as MPEG-2, so that you can effortlessly rip and import thoses converted DVD medias into TiVo for easily playback. Well, how to convert DVD to MPEG files without quality loss? Here i strongly recommend you try the Brorosft DVD Ripper, which a powerful yet easy-to-use DVD ripper on Windows that not only helps you remove commercial protection, but also convert them into MPEG-2 format so you can upload the DVD HD movies to TiVo box for home enjoyment.

Easy-to-use interface, fast ripping speed and high output video quality make it outstanding among all the DVD rippers. Besides ripping DVD movies to MPEG-2, it can also help your convert DVD to all other popular video formats like MKV, WMV, FLV, MOV, MP4, AVI, etc. If you're using a Mac, simply turn to DVD Ripper for Mac to rip DVD movies to MPEG on Mac OS X (EI Capitan included). Download the program and finish the conversion in a few simple clicks as followed.

How to rip and convert DVD to MPEG-2 for playback via TiVo

STEP 1. Import your DVD movies

After installation, run the program and insert the DVD disc into your computer's DVD drive. Then click Load DVD to import the DVD files. ISO and IFO files are also supported. You can then choose the subtitles and audio tracks you prefer.


STEP 2. Edit videos (optional)

This DVD to MPEG ripper comes with a built-in video editor, which allows you to customize your videos before the conversion. Click the Edit button to enter the video editing window, where you can crop videos, adjust video effects, insert subtitles and more as you like.

STEP 3. Choose target format

Click the "Format" menu to select "common format -> MPEG 2 Movie" as output audio format. And the default function works well, but if you want to get a better effect, you are allowed to customize the output parameters by clicking "Settings" button in the output settings area. It is recommended to set the Average Video Bitrate to 4500 and the Audio Bitrate to 224 to get the best quality, and the video resolution is set to 720x480 when you are done. Remember not to set a size that is greater than the original DVD file as that is just a waste of space.


STEP 4. Start converting DVD to MPEG-2

When you're sure everything is OK, Click "Start" button on right bottom of the main interface, you are allowed to start conversion. All the DVDs will be converted to TiVo MPEG files at fast speed and high output quality.

Friday, October 2, 2015

How to Import DVD footage to Adobe Premiere Pro CC/CS6/CS5

To import DVD videos to Adobe Premiere Pro for further editing, you'll need to convert DVD to Premiere edit-friendly format first. Here is the simple how-to.


Promiere Pro, as a timeline-based video editing software application, is becoming an indispensable choice for video editng amateurs and professionals. There are maybe occasions when you happen to have some funny DVD collections and also wanna import the footage from DVD into Premiere Pro CC/CS6/CS5 for making some modifications before sharing with friends, but only to find some error message happened due to the Premiere Pro won't recognize DVD footages? Don't worry, this tutorial will share some tips and tricks with you to fix your hassles.

Though Adobe Premiere supports lots of video and audio format, including .vob files in video_ts folder of home-made DVDs. But for videos encrypted in commercial DVD, Adobe Premiere Pro doesn't include the software needed to decrypt DVDs and extract file out. In order to make Premiere Pro work with DVD files soomthly, you'd better rip and convert DVD files to Premiere Pro more friendly-editable format such as MPEG-2 initially via the help of a third party program.

The current software options for ripping a DVD movie to Adobe Premiere Pro are virtually endless. However, to choose a reliable and professional DVD Ripper tool is not easy, here for the purpose of releasing you from the hard-scratching issue, i strongly recommend you try the Brorsoft DVD Ripper for Mac, which enables you fast and easily encode DVD to MPEG-2 videos for better working with Promiere Pro without quality loss on Mac OS X(EI Capitan included). What's more, in the program, there are many output formats have been optimized, they are for portable devices and editing software like iPad, Samsung Galaxy, Final Cut Pro, iMovie, Xbox and more so you just need to click and choose as you want. For Windows owners, please turn to DVD Ripper. Just download this program and follow this guide below to complete importing DVD clips to Adobe Premiere Pro CC/CS6/CS5 for further editing.

How to rip DVD movies to Adobe Premiere Pro with ease

Step 1. Load your DVD movies

[insert]the DVD disc into your DVD drive[and]drag the disc icon from the desktop to the program to load the DVD files. Alternatively, you can click File > Load DVD to locate[and]add the DVD movies you want to convert.


Step 2. select output format

Click "Format" drop-down bar to[select]a proper video format. To edit AVCHD videos in Adobe Premiere, then Adobe Premiere/Sony Vegas > MPEG-2 (*.mpg) is the suitable one.


Tip: Before conversion, you can click "Settings" button[and]enter "Profile Settings" panel to adjust video size, bit rate, frame rate, sample rate[and]audio channels. DVDs are standard definition with a much smaller frame size. Blowing up a file to that size will only reduce the quality.

Step 3. Start DVD to Premiere conversion

Click Convert button to start transcoding DVD to MPEG-2 for Adobe Premiere immediately.

Once the conversion completes, you can click "Open" to find the .MPG videos which can be directly imported to Adobe Premiere Pro CC/CS6/CS5. You've done.